AWS에서 우리는 EC2, EBS, Lambda, S3, RDS, DynamoDB등 정말 다양한 기능을 사용한다.
현재 내가 일하는 회사에서는 전체 Infra(홈페이지나 자체 솔루션, 협업 툴)와 외주 프로젝트에 대한 개발서버를 자체 AWS를 활용하여 개발하는 경우가 많다, 이런 경우 갑자기 DB가 죽거나 서버가 다운되는 현상이 종종 있어 개발자들이 당황하는 경우가 있다(물론..서버 스펙이 아주 높다면 이런 경우가 거의 없겠지만.. 적절한 자원의 서버를 운용하는것이 중요하기에)
그래서 CloudWatch기능에서도 SMS 기능을 사용하려고 했으나! 아직까지 테스트 단계에서의 과금이 부담되어 여러 서칭을 통해 Slack연동을 통해서도 해당 기능을 편하게 이용할 수 있다는 글들을 좀 찾았다.
내가 내린 결론은 AWS Lambda 와 Slack, CloudWatch를 이용하여 Slack으로 모니터링에 대한 알람을 받기로했다..!!!!
이번 글에서는 정말 초심자도 따라 할 수 있게 하나하나 다 안내해보려고 한다. (단 AWS 인스턴스는 준비한다.)
1.Slack 설정
가장먼저 해야할일은 Slack Chanel 생성이다.


위 처럼 채널 생성을 완료하면 해당 채널이 생긴다. (이번에 사용자 추가는 일단 넘어가기로 한다.)
채널 생성을 완료했다면 Slack Api 페이지로 이동하여 app을 생성한다.

Create App을 클릭하면 다음과 같은 화면이 나오는데, Incoming Webhooks를 클릭한다.

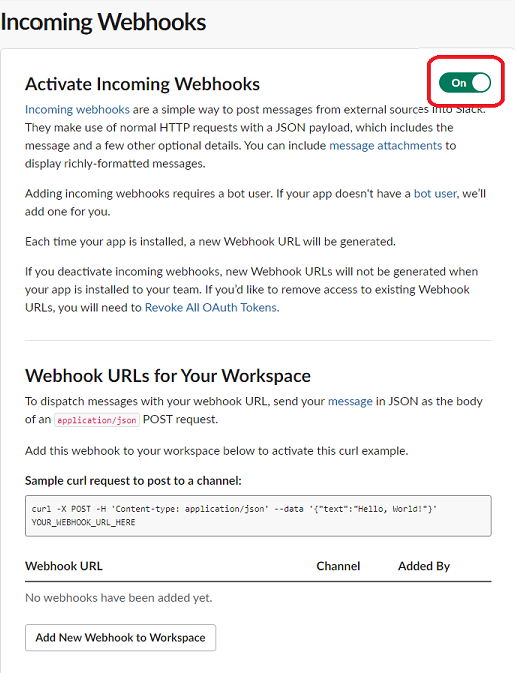
다음 화면으로 이동하면 아래의 사진 처럼 off를 on으로 바꿔주고 맨아래의 Add New Webhook to Workspace 클릭!

이제 아래의 화면 처럼 넘어오게 되는데, 앞서 생성해둔 채널로 설정한 뒤 허용을 누른다(난 aws-monitoring 이다)

이제 진짜 거의 다왔다!!! 아래 그림처럼 본인의 HookURL이 생성되는 메모장에 적어두면 뒤에 작업시에 아주 편한다!

올바르게 생성됐는지 테스트가 하고싶다면 위의 Sample curl을 Copy해서 날려보면 되는데 Window에서 하다보면 에러가 있을 수 있는데 아래의 내 글을 확인하면 해결이 가능하다.
2023.01.27 - [AWS/기능 소개 및 에러처리] - AWS Slack으로 Monitoring 중 invaild_payload 오류 해결법(Window)
AWS Slack으로 Monitoring 중 invaild_payload 오류 해결법(Window)
다양한 AWS 기능을 둘러보다, 현재 Splunk를 통해 AWS 모니터링을 하고있었다(이는 추후 블로깅 예정) 근데 아쉬운 점은, Splunk는 매번 실행을 해야하고(과금이 나간다는...) 실시간으로 계속 켜놓고
pacloud.tistory.com
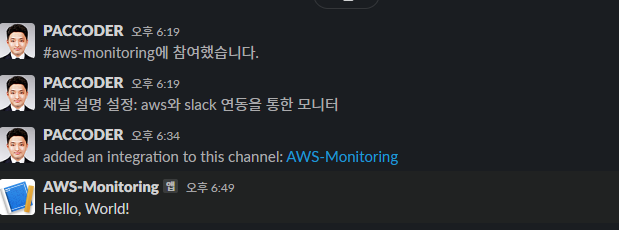
올바르게 연동이 진행됐다면 아래처럼 아주 기분 좋은 Hello World 메세지가 날라온다!

2.AWS 설정
드디어 Slack 설정을 끝내고 AWS관련 기능들을 설정한다. (단, EC2 인스턴스는 생성되어 있어야 하며, 실제 가동중인것을 전제로한다.)
제일 먼저 해야할 일은 SNS(Simple Notification Service)에서의 주제 생성이다.

다음단계로 넘어가면 아래와 같은 화면이 나오는데, 일단은 그냥 생성하자!


주제를 생성했다면, 이제 AWS Lambda 함수를 생성해야 한다. 여기서 부터 잘 따라와야 하는데,

블루프린트 사용 클릭, 아래의 'select bluepring' 에서 send cludwatch...을 선택한다. 그 후에 함수 명 정해주기!
그 다음 아래에서는 생성한 SNS 주제를 연결한다

. 그 다음에는 아래의 샘플 테스트 코드등을 보며 환경 변수를 세팅해야 하는데, 나는 KMS 암호화는 스킵한다.
그렇기 떄문에, 환경변수의 kms*의 값을 지우고 hookUrl 이라는 환경 변수를 생성 할 것이다.!
(우리는 위에서 이 hookUrl값을 copy 해놨었다)
또한 slackChannel의 값을 입력할건데 이는 본인이 생성한 slack 채널 값을 넣어주면된다.

위처럼 작업이 끝나고 아래와 같은 화면이 생성된다.

본격적으로 생성이 되었다면 이제는 Lambda 함수 코드를 좀 변경해보려고 한다. ( 기본 제공되는 코드는 아래와 같다.)
'''
Follow these steps to configure the webhook in Slack:

  1. Navigate to https://<your-team-domain>.slack.com/services/new

  2. Search for and select "Incoming WebHooks".

  3. Choose the default channel where messages will be sent and click "Add Incoming WebHooks Integration".

  4. Copy the webhook URL from the setup instructions and use it in the next section.

To encrypt your secrets use the following steps:

  1. Create or use an existing KMS Key - http://docs.aws.amazon.com/kms/latest/developerguide/create-keys.html

  2. Expand "Encryption configuration" and click the "Enable helpers for encryption in transit" checkbox

  3. Paste <SLACK_CHANNEL> into the slackChannel environment variable

  Note: The Slack channel does not contain private info, so do NOT click encrypt

  4. Paste <SLACK_HOOK_URL> into the kmsEncryptedHookUrl environment variable and click "Encrypt"

  Note: You must exclude the protocol from the URL (e.g. "hooks.slack.com/services/abc123").

  5. Give your function's role permission for the `kms:Decrypt` action using the provided policy template
'''

import boto3
import json
import logging
import os

from base64 import b64decode
from urllib.request import Request, urlopen
from urllib.error import URLError, HTTPError


# The base-64 encoded, encrypted key (CiphertextBlob) stored in the kmsEncryptedHookUrl environment variable
ENCRYPTED_HOOK_URL = os.environ['kmsEncryptedHookUrl']
# The Slack channel to send a message to stored in the slackChannel environment variable
SLACK_CHANNEL = os.environ['slackChannel']

HOOK_URL = "https://" + boto3.client('kms').decrypt(
    CiphertextBlob=b64decode(ENCRYPTED_HOOK_URL),
    EncryptionContext={'LambdaFunctionName': os.environ['AWS_LAMBDA_FUNCTION_NAME']}
)['Plaintext'].decode('utf-8')

logger = logging.getLogger()
logger.setLevel(logging.INFO)


def lambda_handler(event, context):
    logger.info("Event: " + str(event))
    message = json.loads(event['Records'][0]['Sns']['Message'])
    logger.info("Message: " + str(message))

    alarm_name = message['AlarmName']
    #old_state = message['OldStateValue']
    new_state = message['NewStateValue']
    reason = message['NewStateReason']

    slack_message = {
        'channel': SLACK_CHANNEL,
        'text': "%s state is now %s: %s" % (alarm_name, new_state, reason)
    }

    req = Request(HOOK_URL, json.dumps(slack_message).encode('utf-8'))
    try:
        response = urlopen(req)
        response.read()
        logger.info("Message posted to %s", slack_message['channel'])
    except HTTPError as e:
        logger.error("Request failed: %d %s", e.code, e.reason)
    except URLError as e:
        logger.error("Server connection failed: %s", e.reason)
우리는 KMS 암호화를 적용하지 않을 것이고 직접 hookUrl을 사용하기 때문에 아래와 같이 코드를 변경한다.
import boto3
import json
import logging
import os

from base64 import b64decode
from urllib.request import Request, urlopen
from urllib.error import URLError, HTTPError


# The base-64 encoded, encrypted key (CiphertextBlob) stored in the kmsEncryptedHookUrl environment variable
# ENCRYPTED_HOOK_URL = os.environ['kmsEncryptedHookUrl']
# The Slack channel to send a message to stored in the slackChannel environment variable
SLACK_CHANNEL = os.environ['slackChannel']
HOOK_URL = os.environ['hookUrl']
logger = logging.getLogger()
logger.setLevel(logging.INFO)


def lambda_handler(event, context):
    logger.info("Event: " + str(event))
    message = json.loads(event['Records'][0]['Sns']['Message'])
    logger.info("Message: " + str(message))

    alarm_name = message['AlarmName']
    #old_state = message['OldStateValue']
    new_state = message['NewStateValue']
    reason = message['NewStateReason']

    slack_message = {
        'channel': SLACK_CHANNEL,
        'text': "%s state is now %s: %s" % (alarm_name, new_state, reason)
    }

    req = Request(HOOK_URL, json.dumps(slack_message).encode('utf-8'))
    try:
        response = urlopen(req)
        response.read()
        logger.info("Message posted to %s", slack_message['channel'])
    except HTTPError as e:
        logger.error("Request failed: %d %s", e.code, e.reason)
    except URLError as e:
        logger.error("Server connection failed: %s", e.reason)
아 그리고 가장 중요한 것이 있는데 코드를 수정하고 꼭! Deploy 버튼을 눌러야 한다.
(심지어, Changes not deployed라고 말도 해준다...)

이제 AWS 설정도 거의 다 온거 같지 않은가? 하지만 아직 좀 남았다! 이제 CloudWatch를 설정해보려고 한다.

해당 인터페이스는 새롭게 제공된 CLoudWatch 인터페이스라고 하는데 개인적으로는 맘에 든다, 자 경보생성을 누르자.

경보생성을 누르면 위의 화면으로 넘어오는데 지표선택을 통해 지표를 골라보자.


70%이상 사용률만 체크하게 구성했다. 이제 다음을 누르면 작업 구성을 계속해서 진행한다.

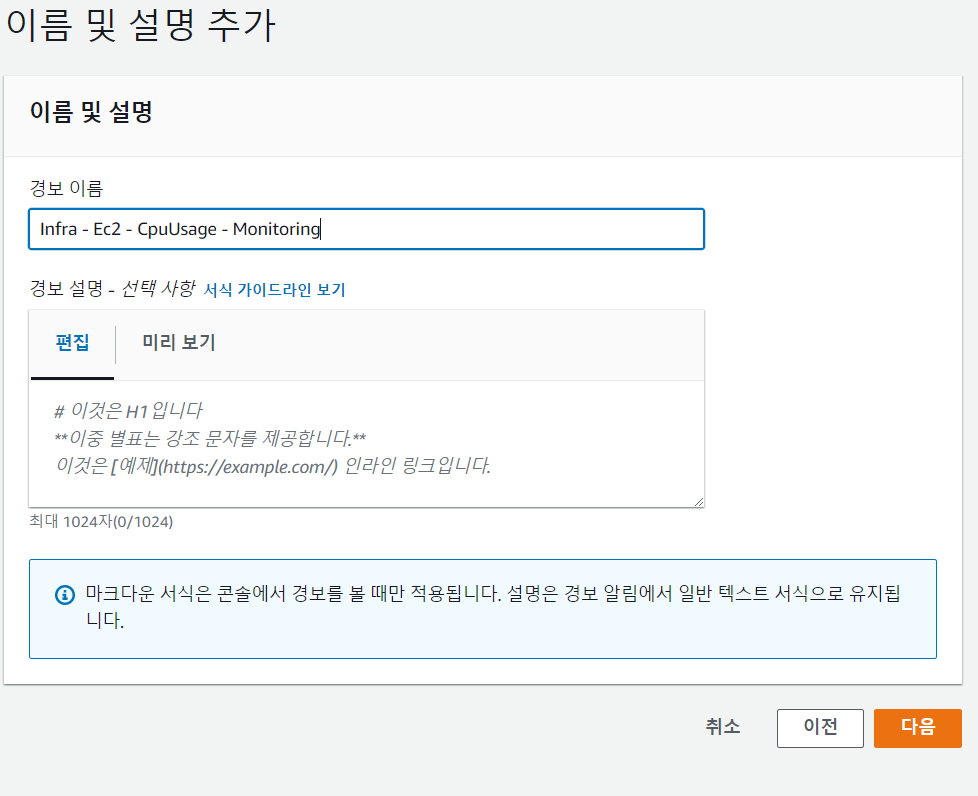
기존 함수를 알맞게 선택했다면, 다음으로 넘어가 이름 및 설명 추가 작업 등을 진행하고 경보를 생성한다.

경보생성을 완료 한뒤 Lambda 콘솔로 돌아가서 SNS 트리거를 확인한다.
(아래와 같이 구성된 것을 확인 가능하다.)

위의 그림까지 확인했으면 코드로 돌아가서 테스트를 진행해보려고 한다. 아래의 그림처럼 테스트 옆 화살표
Configure test event를 클릭하여 새 테스트를 생성하겠다.

아래 처럼 새 이벤트 생성 창에서 코드를 작성하고 이벤트 이름을 설정 할 것이다.

혹시 몰라 코드 전문을 첨부한다.
{
  "Records": [
    {
      "EventSource": "aws:sns",
      "EventVersion": "1.0",
      "EventSubscriptionArn": "arn:aws:sns:eu-west-1:000000000000:cloudwatch-alarms:xxxxxxxx-xxxx-xxxx-xxxx-xxxxxxxxxxxx",
      "Sns": {
        "Type": "Notification",
        "MessageId": "xxxxxxxx-xxxx-xxxx-xxxx-xxxxxxxxxxxx",
        "TopicArn": "arn:aws:sns:eu-west-1:000000000000:cloudwatch-alarms",
        "Subject": "ALARM: \"Example alarm name\" in EU - Ireland",
        "Message": "{\"AlarmName\":\"Example alarm name\",\"AlarmDescription\":\"Example alarm description.\",\"AWSAccountId\":\"000000000000\",\"NewStateValue\":\"ALARM\",\"NewStateReason\":\"Threshold Crossed: 1 datapoint (10.0) was greater than or equal to the threshold (1.0).\",\"StateChangeTime\":\"2017-01-12T16:30:42.236+0000\",\"Region\":\"EU - Ireland\",\"OldStateValue\":\"OK\",\"Trigger\":{\"MetricName\":\"DeliveryErrors\",\"Namespace\":\"ExampleNamespace\",\"Statistic\":\"SUM\",\"Unit\":null,\"Dimensions\":[],\"Period\":300,\"EvaluationPeriods\":1,\"ComparisonOperator\":\"GreaterThanOrEqualToThreshold\",\"Threshold\":1.0}}",
        "Timestamp": "2017-01-12T16:30:42.318Z",
        "SignatureVersion": "1",
        "Signature": "Cg==",
        "SigningCertUrl": "https://sns.eu-west-1.amazonaws.com/SimpleNotificationService-xxxxxxxxxxxxxxxxxxxxxxxxxxxxxxxx.pem",
        "UnsubscribeUrl": "https://sns.eu-west-1.amazonaws.com/?Action=Unsubscribe&SubscriptionArn=arn:aws:sns:eu-west-1:000000000000:cloudwatch-alarms:xxxxxxxx-xxxx-xxxx-xxxx-xxxxxxxxxxxx",
        "MessageAttributes": {}
      }
    }
  ]
}
위 처럼 코드 작성을 완료하고 이벤트 생성을 끝냈다면, Test 를 진행하자.


위 처럼 테스트를 성공 적으로 해내고 Slack에 메세지가 온다...엄청난 감동의 순간...
이제 마지막으로 나는 유저가 알아볼 수 있게 Slack으로 전달 되는 메세지의 형식을 바꾸려고한다.
참고 할 만한 내용은 Slack의 Building attachments 가이드를 참고하여 Lambda에 적용하면 된다.
해당부분의 코드는 https://blog.cowkite.com/blog/2001151846/ 해당 블로그를 참조했다.
'''
Follow these steps to configure the webhook in Slack:

  1. Navigate to https://<your-team-domain>.slack.com/services/new

  2. Search for and select "Incoming WebHooks".

  3. Choose the default channel where messages will be sent and click "Add Incoming WebHooks Integration".

  4. Copy the webhook URL from the setup instructions and use it in the next section.

To encrypt your secrets use the following steps:

  1. Create or use an existing KMS Key - http://docs.aws.amazon.com/kms/latest/developerguide/create-keys.html

  2. Expand "Encryption configuration" and click the "Enable helpers for encryption in transit" checkbox

  3. Paste <SLACK_CHANNEL> into the slackChannel environment variable

  Note: The Slack channel does not contain private info, so do NOT click encrypt

  4. Paste <SLACK_HOOK_URL> into the kmsEncryptedHookUrl environment variable and click "Encrypt"

  Note: You must exclude the protocol from the URL (e.g. "hooks.slack.com/services/abc123").

  5. Give your function's role permission for the `kms:Decrypt` action using the provided policy template
'''

import boto3
import json
import logging
import os

from base64 import b64decode
from urllib.request import Request, urlopen
from urllib.error import URLError, HTTPError


# The base-64 encoded, encrypted key (CiphertextBlob) stored in the kmsEncryptedHookUrl environment variable
# ENCRYPTED_HOOK_URL = os.environ['kmsEncryptedHookUrl']
# The Slack channel to send a message to stored in the slackChannel environment variable
SLACK_CHANNEL = os.environ['slackChannel']

HOOK_URL = os.environ['hookUrl']

logger = logging.getLogger()
logger.setLevel(logging.INFO)


def lambda_handler(event, context):
    logger.info("Event: " + str(event))
    message = json.loads(event['Records'][0]['Sns']['Message'])
    logger.info("Message: " + str(message))

    alarm_name = message['AlarmName']
    alarm_description = message['AlarmDescription']
    old_state = message['OldStateValue']
    new_state = message['NewStateValue']
    reason = message['NewStateReason']
    change_time = message['StateChangeTime']

    color = "#30db3f" if alarm_name.find("off") >= 0 else "#eb4034"

    slack_message = {
           "channel": SLACK_CHANNEL,
            "attachments": [{
             "color": color,
             "blocks": [
                {
                    "type": "section",
                    "fields": [
                {
                     "type": "mrkdwn",
                    "text": "*상태 변경 전:*\\n" + old_state
                 },
                {
                     "type": "mrkdwn",
                    "text": "*상태 변경 후:*\\n" + new_state
                },
                {
                     "type": "mrkdwn",
                    "text": "*경보 이름:*\\n" + alarm_name
                },
                {
                     "type": "mrkdwn",
                    "text": "*경보 시간:*\\n" + change_time
                }
            ]
            },
            {
            "type": "actions",
            "elements": [
             {
               "type": "button",
               "text": {
                   "type": "plain_text",
                   "text": "Cloud Watch :eyes:"
               },
               "style": "primary",
               "url": "<https://ap-northeast-2.console.aws.amazon.com/cloudwatch/home?region=ap-northeast-2#dashboards:name=CPU>"
             }
         ]
       }
     ]
   }],
   "blocks": [
     {
       "type": "section",
       "text": {
           "type": "mrkdwn",
           "text": ":female_fairy: 본사의 Infra서버 인스턴스의 \\n*" + alarm_description + "* 이 되어서 해당사항을 알립니다"
       }
     },
     {
       "type": "divider"
     },
     {
       "type": "context",
       "elements": [
           {
               "type": "mrkdwn",
               "text": reason
           }
       ]
     }
   ]
 }
해당 코드까지 배포가 완료되었다면 Slack을 5분동안..쳐다본다.....(크흡..)

아주 편안하게..알람이 온다 이게 업무의 자동화 아닐까...! 오늘의 포스팅은 여기까지!
'AWS > 기능 소개 및 에러처리' 카테고리의 다른 글
| [AWS Ec2] Failed to connect to your instance, Error establishing SSH connection to your instance 에러 해결법 (1) | 2023.06.26 |
|---|---|
| AWS Cloud9 과 streamlit을 활용한 이미지 분석 기능 구현 (0) | 2023.05.22 |
| DNN학습에서의 AWS EC2 g4dn xlarge vs 2xlarge 성능 및 과금비교 (1) | 2023.04.18 |
| AWS SageMaker Immersion Day (1) | 2023.02.07 |
| AWS Slack으로 Monitoring 중 invaild_payload 오류 해결법(Window) (1) | 2023.01.27 |


